If you have regular trips to snowy areas or mountains, it won’t be long before you need to use snow chains or tire chains. Be sure that you get the correct set that suits your vehicle.
Table of Contents
Two Things To Do Before You Leave
Driving conditions are probably nasty if need to use tire chains. Snow comes down heavily, passing traffic sprays slush, the roads are slick, it might be dark, and dirty water drips off the wheel wells. Don’t wait for these conditions to use your tire chains for the very first time.

Try to practice installing your tire chains once prior to embarking on your trip. Make the most out of your dry driveway and garage to ensure that your winter tire chains are of the correct size and you are comfortable enough with putting them on. You can also get the help of the experts if needed.
You might also want to prepare simple safety kit for winter road trip with waterproof layers, warm gloves, and other stuff to ensure a more comfortable and safe winter driving. During winter months, you should always carry the emergency kit with you in your vehicle together with your tire chains.
How and When to Install Tire Chains
When you already feel comfortable enough with installing your tire chains, you are now fully read to hit the snow-covered road.
1. Stay safe
Once you get on the road, try pulling off as far as you can on the safe should. Turn the hazard lights on. Wear your waterproof layers, gloves, headlamp, and hat from your kit for your winter road trip.

2. Determine the right tires.
The snow chains should go on the front if you have a front-wheel drive vehicle. On the other hand, the chains should go on the back if you have a rear-wheel drive. Meanwhile, your vehicle is an all-wheel drive, it is best to refer to your owner’s manual. In case you are still unsure, don’t hesitate to seek help from the experts.
3. Take out the chains and instructions
After you park your vehicle, open the bag and get your first chain and the instructions. You will find two chains in each bag. Your chains come with a plastic instruction mat that you can use as a barrier between the snow and you for you to stay dry.
4. Untangle the chains
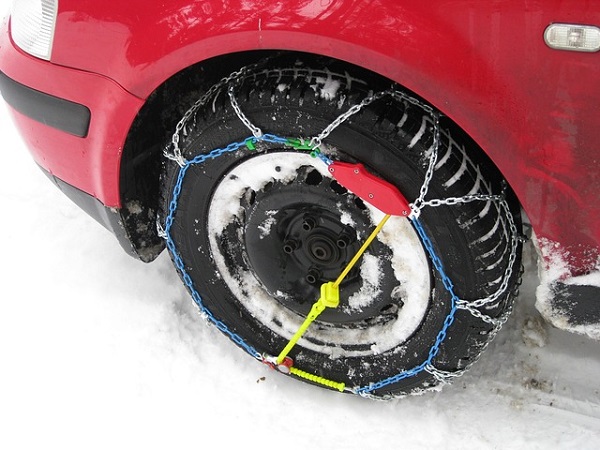
As you hold them from the cable covered in plastic, be sure that everything is good and straight, with the chains not looping over each other. Hold up the chains with your right hand holding the blue end and your left hand holding the yellow end. The chains must hang loosely with the metal hooks visible along the blue and yellow sections facing away from you to ensure that they don’t damage the tires.
5. Put the chairs on your tire then connect the cable
Lay the chains on the ground before pushing them at the back of the tire, with the yellow end of the cable first, starting from the right to the left side.
After you center the chains at the back of the wheel, grab the two ends then pull these up above the tire. The chains must be felt against the axle. It will let you easily connect the cable’s blue and yellow through slipping one end to the other then pulling both of them into the right place.
6. Attach the red hook
After connecting the cable on top, find the red hook directly opposite the cable connection. Attach the red hook found on the right to the very first gold link available on the left.
7. Inspect the diamond shape
You can now push the connected chain above the tire. At this point, you must see a diamond shape in your chains against the tire. The center rail can be found between each of these diamonds that you need to place down the center of the tire tread.
8. The red chain on the bottom must be connected
After the connecting the cable on top, you can look for that red hook that is found on the direct opposite of the cable connection. The red hook on the right must be connected to the first gold link that you can find on the left. The connected chain should be pushed above the tire.
The chains’ bottom comes with a red draw chain that has a chain guide on your left and bungee on the right. Pull out both of these towards you.
Grab the long red chain, running it through the chain guide then use your hands to pull this as tightly as possible. Never use the bungee for pulling. While you pull, one chain link will be able to find its way to the red chain guide’s notch that will then lock it into place.
With the use of the red chain’s bungee end, pull this through both or one of the red loops then secure this to the gold side chain that is opposite the red loops. It would just be fine if you cannot get this through the loops. You can just pull tight through one then attach this to the side chain to the loop’s left side.
9. Repeat the process on the second tire.
Just repeat all of the above steps for installing chains on your vehicle’s other side.
10. Drive forward a bit
The next thing you can do is drive forward slightly at around 15 feet or the full length of the car. It will give the snow chains the chance to settle and relax on your tires.
11. Tighten the chains again
Unhook the red draw chain’s rubber tip then re-tighten them. Once it is tight enough, the red chain can be guided through the loops and have the bungee end latched securely once again to gold side chain.
The Withcar snow chains must be tight on your tire. You also have to stop if you ever hear them make any contact with your car to ensure a safe drive.